- Created code for time and color conversion
- Cut wood
- Figured out Arduino voltage output with PWM
We made a lot of progress on the software this week. We are almost done with the coding on the assignments of the times and color temperatures from the daylight matching research we have found (the code isn't difficult, just long and bulky). We also found a way to convert color temperatures, which is the data we have found on LED daylight matching, into RGB values, which is we need to give to the LEDs. We took this code, designed for color-correcting photos based on lighting conditions, and modified it to run on an Arduino.
Our current algorithm is as follows:
Setup:
Assign wakeup and bedtimes.
Divide the number of waking hours by 15; this is our time interval.
Divide the day into time intervals.
Assign each time interval a color temperature.
Continuous loop:
Check the time.
Get appropriate color temperature.
Convert color temperature to RGB.
Send voltage information to LEDs.
Repeat.
The remaining code deals with the clock and voltage functions.
This week we got ourselves familiar with the hardware behind changing the LED RGB values. It is done with pulse width modulation (PWM). Voltage from the Arduino can only be at 0 or 5V, but by adjusting the frequency at which the voltage is applied, it can act like a fraction of a voltage.
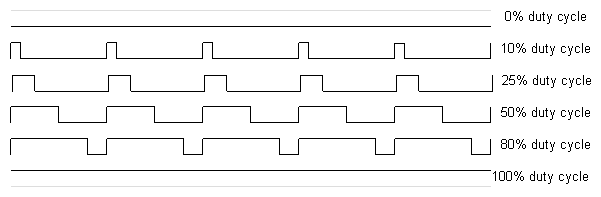 |
| Changing the duty cycle changes the voltage output. |
 |
| Our breadboarded PWM circuit. |
Upon testing the LEDs with some sample color changing code, we found that the lights would flicker at certain PWM values. We did some research and found that it can happen at low PWM values when the PWM is a certain mode, so we increased the values and fixed that problem. Now, the circuit is stable and we can continue with color testing.
When testing the LEDs with the diffusing sheet, we discovered that edge lighting does not work as we planned. It leaks around the edges much more than we anticipated and, more importantly, does not actually illuminate the entire sheet. Once we looked further into the properties of the material used in the panel (the same as used in these TVs, it turned out that the material is usually backlit. Testing the window with the LEDs behind it proved much more successful. Our new plan is to backlight the window with several strips of LEDs about an inch back from the pane, to allow the light to spread out and not appear as single dots.
Now that we are not edgelighting the window, we can ignore the problem of trying to fit the LEDs in to the sides of the frame. The frame will now hold the pane in simple slits along the edges and have space on the back panel to hold the LEDs in place. We made some more cuts on the wood this week, including the angle cuts to put the 2-by-4s together at the corners, but errors were made and we will have to correct this in lab next week before we can assemble the frame.
Next Steps:
- Program clock and voltage code.
- Fix frame cuts.
- Assemble frame.
- Start installing lights into frame.
No comments:
Post a Comment