Goals completed:
- Ordered most of the materials
- Started building frame
- Started planning 3D-printed frame materials
- Downloaded all necessary software for Arduino
- Wrote Arduino pseudocode
- Began wiring lights
This week we really started getting into the meat of our design. We now have most of the materials we need to do the work, and most of the planning is done.
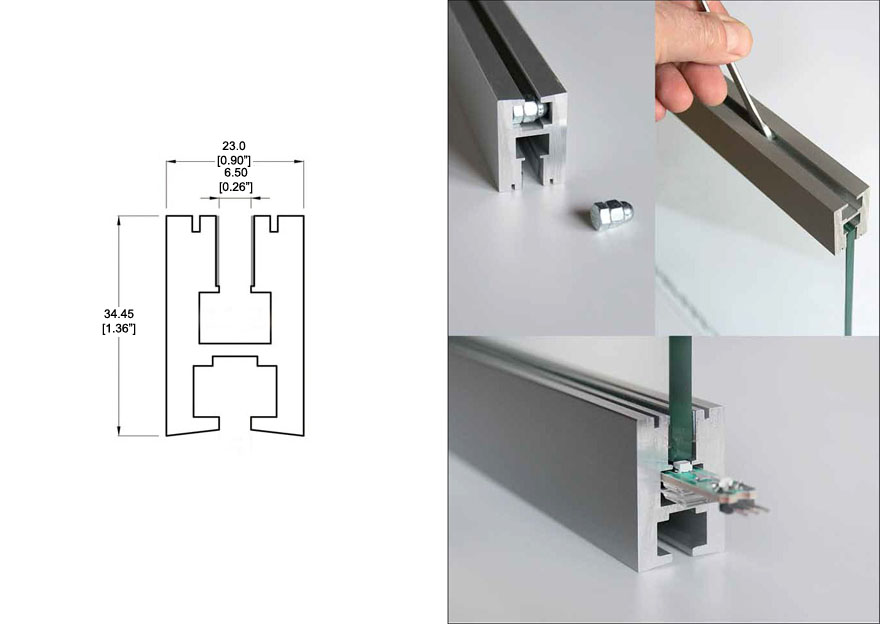
On the frame side of the project, we got all the lumber and a diffusing plate (thank you Dr. Ellis and Mr. Zuker), and we have a plan for what it should look like. Now that we have the diffusing plate and the LEDs, we can figure out how we're going to get them lit. Our current plan is to use sidelighting, aligning the lights with the side of the diffusing plate instead of the back to spread the light throughout the window pane. Some research shows that we probably want a frame for the LED strips that looks something like this.
Our best idea is to see if we can 3D-print several strips of this to go along the sides of the plate, but it could take up more material than we have available.
It looks like we will need to carve channels in the wood in order to fit the LED holder. We also considered trying to carve a holder directly into the wood, but we don't think we can do that much detail. We did make our first cuts, so now we have the wood cut down to the correct sizes. We still need to make the detail cuts and diagonal cuts before we begin fitting the pieces together.
On the electronics side of things, we finally got our Arduino and LEDs delivered and could begin wiring them together. We learned how to wire the LEDs to the breadboard correctly and tested it with
a sample color-changing program from the LED seller, modified slightly. It worked great, as shown in the video below. We also tested out soldering the wires in place. The initial test seems promising, but some wires came loose. We need to work out a way to make sure everything stays in place.
 |
| Our modified version of the color-changing code. |
 |
| Our LEDs changing color with sample code. |
On the software side, we developed a plan for how to change the lights to match daylight. An early version of the pseudocode is shown below. Essentially, we give the code a wakeup time and a bedtime and divide it into small segments. Every time the time enters a new segment, the voltages for the RBG values of the LEDs are adjusted to make the correct color.
 |
A brief pseudocode for the program.
|
The data we're using as a guideline for what color the lights should be comes from this experiment of daylight matching in nursing homes. We will take their schedule, scale it based on our wakeup and bedtime, and map the LED colors accordingly. The bulk of the programming left is just making the if/elses and setting each lighting condition, in addition to converting color temperatures into RGB values.
Next Steps:
- Finalize lighting scheme
- Continue coding
- 3D-print LED holder
- Build frame
- Continue wiring the lights


NICE!
ReplyDelete